
Fall is very exciting in Southern California. It is when you start wearing long sleeve shirts and possibly shut your windows at night. Since we don't get typical fall weather here I try and find other ways to get in the spirit.
Lanterns have been very popular for a while now, I decided to shamelessly jump on the bandwagon with this tutorial.

Materials:
- *4 wooden frames with glass. I used 8 1/2 x 11 ($1 each a the dollar store)
- *1 old recess light (I bought mine from Habitat for Humanity)
- *Nails
- *Hammer
- *Spray paint

How much do the recess lights look like lantern tops?
Instructions:
1. Remove the glass from your frames.
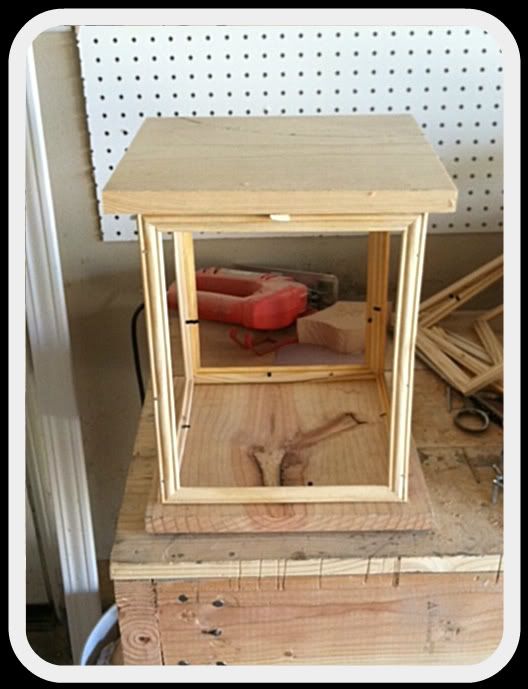
2. Nail/Screw all 4 picture frames together to make a box. I used tiny wire nails.
3. Cut two squares, one for the base and one for the top. I made my cube and then decided how big I wanted the base/top. I made the base and the top the same size.
4. Attach your picture frame cube to the base. *Do not attach the top yet*
6. Attach the recess light to your top. I predrilled two holes and used screws to attach.
Optional Steps
- Freak out a
- Decide it doesn't look *bad*, per se, but it looks like picture frames with a recess light on top.
- Reaffirm that a picture frame with a light on top is not the look you are going for.
- Run inside to answer your work phone. Don't they know you are crafting? Do they expect you to just stay by the phone from 9am-4pm?
- Return to your project invigorated because nothing can go as bad as that work phone call!
7. Sand the entire thing to smooth wood and soften edges.
8. Wipe all dust from the lantern and proceed to spray painting!
Tralah! I love spray painting. I get all happy, excited and feel like the rest of the project is downhill from here......... Maybe it is the paint fumes. It probably is now that I think about it. I blew my nose the other day there was a little "Oil Rubbed Bronze" on the tissue. Huh. *makes mental note to check into spray paint poisoning symptoms*
9. Put the panes of glass back in, add an electric candle and enjoy the ambiance.

I love the lantern. I plan on going back to the dollar store to get frames in different sizes. My original plan was to place this lantern on the porch but it has found a home on my hearth.
You can customize this tutorial by adding frosting to the glass panes, changing the size and also adding more layers of wood to the base and top. Stacking flat pieces gives the item depth and makes it look more expensive.
If you are not inclined to using power tools I am selling these at my Etsy Shop. Mentioned you were referred from my blog for a 10% discount.
Show me lanterns, ladies!
Oh my gosh! You are incredibly cool and crafty. That is brilliant! Who knew you could make a lantern from frames and dollar store ones at that! I am a new follower from Catch a Glimpse Thursday. I am co-hosting the Terrific Thursday blog hop and would love for you to link up your blog at http://www.messforless.net/2011/11/terrific-thursday-blog-hop-week-39.html
ReplyDeleteHoly smokes, I am IN LOVE with this lantern!!!! It turned out just amazing! Thank you so much for sharing this tutorial - I was actually looking for some lanterns recently, and wasn't particularly pleased with the selection I came across (either it's cheap... and looks it... or it's expensive and not worth it!) I think this is a great way for me to get a lantern I want at a price I can be happy with!!!
ReplyDeleteTake care,
Christina
designingbynumbers.blogspot.com
I am so glad you like it! I really want to try a more modern lantern.... maybe with pewter and a graphic design frosted onto the glass.
ReplyDeleteMake you sure show me pics if you make one, Christina.
Now I'm adding one more thing to my to-do list!! I am impressed by your creativity and ingenuity. Thank you for sharing your lovely idea. God bless x
ReplyDeleteOh wow! You did an awesome job! I love how it turned out!
ReplyDeleteThanks for stopping by to link up!
~Angela
The Not So Functional Housewife
This is an ingenious craft if I ever saw one. Bravo!
ReplyDeleteWow!!! That idea is amazing...so unique!!! You are definitely one talented gal!
ReplyDeleteAwesome! So creative and it's beautiful! I love it!
ReplyDeleteWhat an amazing tutorial. Who would have thought to use recessed lights--oh YOU would. Great job
ReplyDeleteCheri
Oh my, your picture frame turned out wonderful! Thanks you so much for this great post.
ReplyDeleteLondon Framing
Are you able to open the lattern at all so you can get inside.
ReplyDeleteI'm wondering the same thing.
DeleteThis comment has been removed by the author.
DeleteVery Beautiful Blog.
ReplyDeletePicture Frame Sydney